Monday, May 17, 2021

Create an Email Tracking Campaign using Azure Functions

Email Campaigning

Have you ever received an email and opened it, only to receive another email that is tailored more toward what you viewed? This is email targeted campaigning, ands can be done in several ways. A campaign email system allows you to track several points of interaction with an email to gain the most insights from a users. The basics are, is the email sent, did the user open the email, and what links did the user click, along with how many times the email was opened or clicked by the user. Tracking who is sent an email can be easily handled with our code, if the email does not error out it was sent. Tracking a link click is easy too, each link inside the email can be formed to include a unique identifier and user information from the campaign system the interaction.. But what happens if you don't click a link how does the company know you were interested? There must be something in the email to do this? 

Simple, an image. These images are usually referred to as 0 pixel images which are image tags that reference a URL instead of an image. So when the email loads the image it is actually logging the interaction with the email.

In this post, we are going to create an email campaign system in 5 minutes.

Creating an Email Campaign in 5 Minutes

Setup SQL

The first thing we need to do to setup our email campaign is create a database to capture our campaign details. I will be using Azure SQL  to do this. This is pretty straight forward, choose your plan and follow the steps. Once done, make sure to add your IP to the firewall. You will need at least one SQL database to add our tables.


For this post, we will be setting up 3 simple tables, one for creating a campaign, one for tracking if an email is sent, and one for tracking if an email is opened. Thee commands can be run from SQL Server management studio or the Query Editor Preview (at the time of this writing) feature in the Azure SQL section .


CREATE TABLE Campaigns(CampaignId nchar(36) NOT NULL PRIMARY KEY, Subject nvarchar(255) NOT NULL)
CREATE TABLE sent_tracking(SentID nchar(36) NOT NULL PRIMARY KEY, Email nvarchar(255) NOT NULL, Sent bit NOT NULL, Campaign nchar(36) NOT NULL FOREIGN KEY REFERENCES Campaigns(CampaignId))
CREATE TABLE campaign_tracking(TrackingId nchar(36) NOT NULL PRIMARY KEY, Email nvarchar(255) NOT NULL, OpenDate datetime NOT NULL, Campaign nchar(36) NOT NULL FOREIGN KEY REFERENCES Campaigns(CampaignId))

Setup Azure Function

With our SQL database setup, we can now create an Azure function for tracking our emails that our opened. I will be using a VS code extension for creating the Azure Function this will allow me to create and deploy my function to Azure. This extension is aptly named "Azure Functions". 


With our add-in installed, we can create and setup our Azure Function. If prompted, sign in to your Azure account. once you see your Azure subscription, click the lightning bolt with a plus next to it to create the function.


You will be asked a series of questions, the first is the language to create the function, this post I will use C#.


Next, VS Code will ask what type of function I want. I want the function to execute every time it is called, so HTTPTrigger is the project type.


The function needs a name, for the purposes of this blog I will name it EmailTrackingFunction. A namespace will be required as well.


Finally, Azure wants to know how to secure the function, no credentials will be used so it will be anonymous for this example. 


Our Azure function will capture the user's email address and what time they opened the email. Every time the email image is loaded, our system will make an entry into our SQL database.


using System;
using System.Collections.Generic;
using System.Net;
using Microsoft.Azure.Functions.Worker;
using Microsoft.Azure.Functions.Worker.Http;
using Microsoft.Extensions.Logging;
using System.Data.SqlClient;
using Microsoft.Extensions.Configuration;

public static class EmailTrackingFunction
    {
        [Function("EmailTrackingFunction")]
        public static HttpResponseData Run([HttpTrigger(AuthorizationLevel.Anonymous, "get", "post")] HttpRequestData req,
            FunctionContext executionContext)
        {
            var logger = executionContext.GetLogger("EmailTrackingFunction");
            

            // create connection to local settings
            var config = new ConfigurationBuilder()
                        .AddJsonFile("local.settings.json", optional: true, reloadOnChange: true)
                        .AddEnvironmentVariables()
                        .Build();
            string cs = config.GetConnectionString("EmailTrackingDB");

            //connect to sql db
            using(SqlConnection connection = new SqlConnection(cs))
            {

                //insert our tracking data into our database
                var queryStrings = System.Web.HttpUtility.ParseQueryString(req.Url.Query);
                connection.Open();
                using(SqlCommand cmd = new SqlCommand("INSERT INTO campaign_tracking (TrackingId, Email, OpenDate, Campaign) Values(@TrackingId, @Email, @OpenDate, @Campaign)", connection))
                {
                    cmd.Parameters.AddWithValue("@TrackingId", Guid.NewGuid());
                    cmd.Parameters.AddWithValue("@Email", queryStrings.Get("Email").ToString());//email that opened link
                    cmd.Parameters.AddWithValue("@OpenDate",DateTime.Now); //time email was opened
                    cmd.Parameters.AddWithValue("@Campaign", queryStrings.Get("Campaign").ToString()); //ID linked to another table with campaign details

                    cmd.ExecuteNonQuery();

                    //log that email entry was made
                    logger.LogInformation("Logged {0}", queryStrings.Get("Email").ToString());
                }

                connection.Close();
            }

            
           //create a successful response to return in the function
            var response = req.CreateResponse(HttpStatusCode.OK);
           
            return response;
        }

In order to connect to the SQL database, we must reference our connection string. When running locally, we can setup our local.settings.json file to read the connection string. This file does not deploy to Azure, but will allow you to setup a config to mimic the configuration settings in Azure.


{
  "IsEncrypted": false,
  "Values": {
    "AzureWebJobsStorage": "",
    "FUNCTIONS_WORKER_RUNTIME": "dotnet-isolated"
  },
  "ConnectionStrings" : {
    "EmailTrackingDB": "{sql connection string}"
  }
}


With the function created, the final step is to deploy it to Azure. To do this, click the Up arrow in our add-in. If this is the first deployment, it will ask to create the Azure Function or select an existing one. 


Now when you log back into Azure, you should see your newly created function under app services. The final thing we must do is configure the connection string in Azure, since the local.settings.json file will not deploy to our function. Inside the configuration of our function, there is a section for connection strings. All that needs to be done is copying and pasting the connection string here and save the updated configuration.


Create Console App for sending emails


The email tracking function is now setup, but in order to test the function an email job must be created. To do this, I will just create a console application that sends emails through Gmail. Gmail allows us to create a SMTP connection and send out emails using that email address. The trick is to allow the app to send emails by allowing less secure connections.
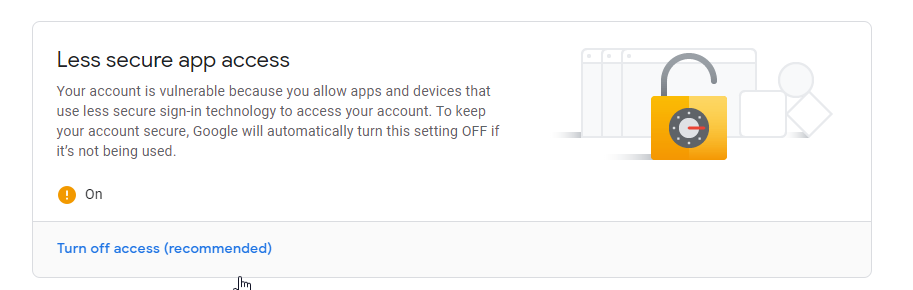

With Gmail configured, we can create our app. I am using SMTP to send the email. Along with creating the entries for our campaign so that we can track how many people open the email.


For our example to work we need to create a campaign with a unique id and then send and email. We will just do a simple insert into SQL to create our campaign, then we will take our unique ID and append it to a URL for our image to call back to the Azure function.

Before creating the function, the project will need references to SQL Client and Mail Client


using System;
using System.Net.Mail;
using System.Data.SqlClient;

Once the reference  to the clients are added, a function for inserting data into the campaign will be needed.

static string CreateCampaign(string Subject)
{
	//Replace with your sql connection string
	string cs = "Server=tcp:sqlconnection,1433;Initial Catalog=trackingdata;Persist Security Info=False;User ID={sql user};Password={sql password};MultipleActiveResultSets=False;Encrypt=True;TrustServerCertificate=False;Connection Timeout=30;";
	string campaignId = Guid.NewGuid().ToString();
	using(SqlConnection connection = new SqlConnection(cs))
	{
		//insert our data into our campaing table to track what campaigns are sent.
		connection.Open();
		using(SqlCommand cmd = new SqlCommand("INSERT INTO Campaigns (CampaignId, Subject) Values(@CampaingId, @Subject)", connection))
		{
			cmd.Parameters.AddWithValue("@CampaingId", campaignId);
			cmd.Parameters.AddWithValue("@Subject", Subject);//email that opened link

			cmd.ExecuteNonQuery();
		}

		connection.Close();
	}

	//return our Unique campaign id
	return campaignId;
}


Inside the main function, I will call the SQL function that returns a unique id and append it to the URL. Then to test I will send the URL to 1 email address.


static void Main(string[] args)
{

	string subject = "Testing Pixel";
	string fromEmail = "{from email}"; //replace with who is sending email
	string toEmail = "{to email}"; //test, this would usually be a list of users
	string campaignId = CreateCampaign(subject); //creates the campaign and returns guid
	string baseUrl = "https://{azure function}/api/EmailTrackingFunction"; //our azure function url
	string imgUrl = $"{baseUrl}?Email={toEmail}&Campaign={campaignId}";// our url for our image

	//connect to gmail
	using(SmtpClient client = new SmtpClient("smtp.gmail.com"))
	{
		client.Credentials = new System.Net.NetworkCredential(fromEmail, "from email password");
		client.Port =587;
		client.EnableSsl = true;

		//create our email
		using(MailMessage msg = new MailMessage(fromEmail, toEmail))
		{
			msg.Subject = subject;
			msg.Body = $"Mass mailout";
			msg.IsBodyHtml = true;

			client.Send(msg);

	
			//would log time/date email was sent in a database here
		}
	}


That's it, we now have a successful email campaign system for sending and tracking mass mailouts. 

Clone the project


You can find the full project on my GitHub site here https://github.com/fiveminutecoder/blogs/tree/master/EmailTracker


Microsoft, C#,C Sharp, Authentication, Azure Functions, SMTP, GMail, Azure App, application, SQL, SQL Server, Azure SQL, Transact-SQL, dot net, dot net core CMS, Content Management System

Tuesday, April 20, 2021

Securing a Microsoft Teams Tab using Azure Active Directory

Custom Teams Tabs

Microsoft O365 has expanded the ecosystem of the traditional office suite with many niche tools. Teams is a tool that has evolved out of that niche into a system that helps pull the office apps into one easy to use area. Teams replaces Skype as the primary chat tool, but it also lets you access SharePoint sites, your OneDrive, planner, and other apps. 

The primary way of accessing apps is through tabs. Tabs are just fancy I Frames that let you embed web pages into Teams. One of the benefits of embedding the page into Teams is the ability to access the user's profile data from Azure. We can get a user's UPN and pull general information about a user and the Team where the tab is opened.

Since we can embed custom pages into the tab, we can now have full blown web applications embedded into the O365 environment. This poses a challenge for security; how do I authenticate the user seamlessly with O365 and my web application? The answer is Azure AD. We can secure our application using Azure AD and then use the Microsoft Teams Client SDK to authenticate to our web application using a supplied id token that can be requested in the Teams Tab using the Microsft Teams SDK.

Authentication using Teams

The Microsoft Teams SDK will allow us to request an ID token that can be passed to our web application to secure our application. There are some caveats such as the Microsoft Teams SDK still uses ADAL to authenticate. This means, we are limited to what we can access in Office 365 with the access token that is also provided. This seems par for the course as the SharePoint client object model and REST services use ADAL with no news on upgrading. ADAL also poses an issue with some more modern browsers, as it requires 3rd party cookies to be active. Luckily Teams is in a corporate environment and can be easily controlled.

Another thing to take into account, is that in order to display a page in Teams it must be anonymous. The page needs to load so that it can call the APIs that provide the login information. This means that any secure data must be behind an API call instead of the standard view you would get with an MVC site. You might be able to use a Challenge Result to sign in the user, but from my experience that usually pops up the Microsoft Login page again which can cause issues in the Teams app because you are redirecting in an I Frame which will cause cross scripting errors.


Configure Azure for Authentication

In order to use Azure AD to authenticate our system, we need to register our application with Azure AD. In your Azure portal, go to the Azure AD section and find App Registrations. I will be creating an application called Teams Authentication.


In the new registration screen I will name my app Teams Authentication. Supported accounts will vary based on your requirements for the app. For this example I will choose my organization's directory only. Next I will add a redirect URI. This is the sign in URI for our application, it will be "https://localhost:5001/signin/signinend". This URI will need to be updated once we test as it is where Microsoft will redirect our tokens. Reminder: spelling and casing count! If your URL is all lowercase here it must be all lowercase in the call to access the token.


With your newly registered app, in the overview screen you will see a client ID. This is needed to create a call to authenticate our application. You can also get your tenant ID here as well to make calls directly to the tenant and create a tenant specific token as opposed to using the common login URL. Also, to authenticate to our web application we will need our appplication to return an Access Token and ID token. This can be selected in the authentication section of the app.


For this example, we will also be authenticating with the Graph API. Our token generated from Teams is limited to what it can access from graph, so we will want to create another app that interacts with Microsoft graph itself. We just want to show how you can authenticate to the web application and make a secure call so our application will be using application permissions to access graph. We will only need User.Read.All for this. The process is similar to above, but will require a secret to be generated for the application. I have done this in a previous post here:  https://www.fiveminutecoder.com/2021/03/creating-azure-document-queue-for.html


Create our tab in 5 minutes

With our app registered with Azure AD we can start to setup our application. First thing we need to do is create our MVC application

dotnet new mvc --name OfficeEmployeeDirectory


Our application will use JWT to authenticate, so we need to install the Microsoft identity model, along with the JWT packages. In order to do this, we will need to install the following DLLs from Nuget.

  1. Microsoft.Identity.Web
  2. Microsoft.Identity.Web.UI
  3. Microsoft.IdentityModel.Clients.ActiveDirectory
  4. Microsoft.AspNetCore.Authentication.JwtBearer
  5. Microsoft.AspNetCore.Authentication.AzureAD.UI
  6. Microsoft.Graph

Next, we will setup or app settings file with our app settings from Azure. We will create 2 sections for our apps. In the AzureAD section notice for the tenant I have common setup. This is used to allow multiple tenants access to your site, if you want only one you can put your tenant ID here, which can be found in the app registration overview. Also, the client id begins with api:// this is because the default auth method is 1.0 if you are using a later authentication method this might not be necessary. Audience in this section is the same as your client id.


{
  "Logging": {
    "LogLevel": {
      "Default": "Information",
      "Microsoft": "Warning",
      "Microsoft.Hosting.Lifetime": "Information"
    }
  },
  "AllowedHosts": "*",
  "SignInUrl": "https://localhost:5001/Signin/SigninStart",
  "ReturnUrl": "https://localhost:5001/signin/signinend",
  "AzureAd": {
    "Instance": "https://login.microsoftonline.com/",
    "Domain": "https://localhost:5001",
    "ClientId": "api://{client id}",
    "TenantId": "common",
    "CallbackPath": "/signin/signinend",
    "Audience": "{client id}",
    "Scopes" : "access_as_user access_as_admin",
    "AllowWebApiToBeAuthorizedByACL" : true
  },
  "DirectoryApp":{
    "TenantId": "{tenant id}",
    "ClientId": "{client id for graph app}",
    "clientSecret": "{client secret for graph app}"
  }
}

With our configurations setup, we can update our Startup.cs file to now allow an id token to be passed. We will be using JWTBearer authentication to validate our token.


public void ConfigureServices(IServiceCollection services)
{
	
	services.AddControllersWithViews();


	//authentication starts here
	services.AddAuthentication(options =>{
		options.DefaultScheme = JwtBearerDefaults.AuthenticationScheme; //using JWT token auth
		
	})
	  .AddMicrosoftIdentityWebApi(Configuration.GetSection("AzureAd")) //auth will act like a web api, otherwise our app tries to popup another login screen which is blocked
	  .EnableTokenAcquisitionToCallDownstreamApi()
	  .AddInMemoryTokenCaches();


	services.AddControllersWithViews(options =>
	{
	  //add authenticated user to secure the app
	  var policy = new AuthorizationPolicyBuilder()
		  .RequireAuthenticatedUser()
		  .Build();
	  options.Filters.Add(new AuthorizeFilter(policy));
	});
	services.AddRazorPages()
	  .AddMicrosoftIdentityUI();
}

Microsoft wants our apps to be transparent, in other words apps require consent. Most of the time this can be granted by the admin, but user consent is required when making calls on the behalf of the users. So in order to login using Azure AD we need to setup login and logout pages that can make calls to Azure AD. There are settings to make this request silently, but takes time to configure and catch those types of calls. So in this case, we will show the login window. To do this we will create a controller called "Signin". In a production setting this would be your authenticate controller but for this blog I changed it so we could understand more what is happening. 

To sign in we have 2 pages SigninStart and SigninEnd, so in order to do this we will need to add some actions to our controller. Please note, these need to be anonymous to make the call.


using System;
using System.Collections.Generic;
using System.Diagnostics;
using System.Linq;
using System.Threading.Tasks;
using Microsoft.AspNetCore.Mvc;
using Microsoft.Extensions.Logging;
using OfficeEmployeeDirectory.Models;
using Microsoft.AspNetCore.Authorization;
using Microsoft.Extensions.Configuration;

namespace OfficeEmployeeDirectory.Controllers
{
    //just controls the login views routing
    [AllowAnonymous]
    public class SigninController: Controller
    {
        private IConfiguration configuration;
        public SigninController(IConfiguration Configuration)
        {
            configuration = Configuration;
        }

        public ActionResult SigninStart()
        {
            ViewBag.ReturnUrl = configuration.GetValue("ReturnUrl");
            ViewBag.ClientId = configuration.GetSection("AzureAd").GetValue("Audience");
            return View();
        }

        public ActionResult SigninEnd()
        {
            return View();
        }
    }
}


The authentication happens client side so our page will juse the Microsft Teams SDK to call out to Azure.


//calls the teams login
//javascript
	let clientId = "@ViewBag.ClientId";
	if (clientId != undefined && clientId != null && clientId !== '') {
		microsoftTeams.initialize();
			let state = _guid();
			localStorage.setItem("simple.state", state);
			localStorage.removeItem("simple.error");
			// See https://docs.microsoft.com/en-us/azure/active-directory/develop/active-directory-v2-protocols-implicit
			// for documentation on these query parameters

			let queryParams = {
				client_id: clientId,
				response_type: "id_token token", //what we want returned
				response_mode: "fragment",
				resource: "https://graph.microsoft.com/", //resource we need access to
				redirect_uri: "@ViewBag.ReturnUrl", //return url
				nonce: _guid(),//unique value to reference in callback so our app can validate it was us making the call
				state: state
			};

			let authorizeEndpoint =
				"https://login.microsoftonline.com/common/oauth2/authorize?" +
					toQueryString(queryParams);
			window.location.assign(authorizeEndpoint);

	}
	// Build query string from map of query parameter
	function toQueryString(queryParams) {
		let encodedQueryParams = [];
		for (let key in queryParams) {
			encodedQueryParams.push(
				key + "=" + encodeURIComponent(queryParams[key])
			);
		}
		return encodedQueryParams.join("&");
	}
	
	//Create a unique identifier to validate the callback
	function _guid() {
			let guidHolder = "xxxxxxxx-xxxx-4xxx-yxxx-xxxxxxxxxxxx";
			let hex = "0123456789abcdef";
			let r = 0;
			let guidResponse = "";
			for (let i = 0; i < 36; i++) {
				if (guidHolder[i] !== "-" && guidHolder[i] !== "4") {
					// each x and y needs to be random
					r = (Math.random() * 16) | 0;
				}
				if (guidHolder[i] === "x") {
					guidResponse += hex[r];
				} else if (guidHolder[i] === "y") {
					// clock-seq-and-reserved first hex is filtered and remaining hex values are random
					r &= 0x3; // bit and with 0011 to set pos 2 to zero ?0??
					r |= 0x8; // set pos 3 to 1 as 1???
					guidResponse += hex[r];
				} else {
					guidResponse += guidHolder[i];
				}
			}
			return guidResponse;
	}


The call will then return a URL for our site that can is used to either show an error or return our token. We will use the Microsoft Teams SDK to return our tokens back to the calling page.


//sign in attempt finished, will parse query strings and save tokens to object
//javascript
	microsoftTeams.initialize();
	
	localStorage.removeItem("simple.error");
	
	let hashParams = getHashParameters();
	
	if (hashParams["error"]) {
		// Authentication/authorization failed
		localStorage.setItem("simple.error", JSON.stringify(hashParams));
		microsoftTeams.authentication.notifyFailure(hashParams["error"]); //notifies our main page of an issue
	} else if (hashParams["access_token"]) {
		// Get the stored state parameter and compare with incoming state
		let expectedState = localStorage.getItem("simple.state");
		if (expectedState !== hashParams["state"]) {
			// State does not match, report error
			localStorage.setItem("simple.error", JSON.stringify(hashParams));
			microsoftTeams.authentication.notifyFailure("StateDoesNotMatch");
		} else {
			// Success -- return token information to the parent page
			microsoftTeams.authentication.notifySuccess({
				idToken: hashParams["id_token"],
				accessToken: hashParams["access_token"],
				tokenType: hashParams["token_type"],
				expiresIn: hashParams["expires_in"]
			});
		}
	} else {
		// Unexpected condition: hash does not contain error or access_token parameter
		localStorage.setItem("simple.error", JSON.stringify(hashParams));
		microsoftTeams.authentication.notifyFailure("UnexpectedFailure");
	}


	// Parse hash parameters into key-value pairs
	function getHashParameters() {
		let hashParams = {};
		location.hash.substr(1).split("&").forEach(function (item) {
			let s = item.split("="),
				k = s[0],
				v = s[1] && decodeURIComponent(s[1]);
			hashParams[k] = v;
		});
		return hashParams;
	}


We have our authentication ready, so the next step is to create an secure end point to call. I just added this to the Home index controller for brevity, this should be on a sperate controller with a /api route.


//our secure endpoint
[HttpGet]
public async Task GetDirectory()
{
	try
	{
		//pulls config data for our graph api
		string tenantId = configuration.GetSection("DirectoryApp").GetValue("TenantId"); //realm
		//some service account with graph api permissions
		string clientId = configuration.GetSection("DirectoryApp").GetValue("ClientId"); 
		//service account password
		string clientSecret = configuration.GetSection("DirectoryApp").GetValue("ClientSecret");; 
		string[] scopes = new string[] {"https://graph.microsoft.com/.default" };

		//creates a header for accessing our graph api
		IConfidentialClientApplication app = ConfidentialClientApplicationBuilder.Create(clientId)
				.WithClientSecret(clientSecret)
				.WithAuthority(new Uri("https://login.microsoftonline.com/" + tenantId))
				.Build();

		//gets token
		AuthenticationResult result = await app.AcquireTokenForClient(scopes).ExecuteAsync();

		//creates graph client
		GraphServiceClient client = new GraphServiceClient("https://graph.microsoft.com/v1.0", new DelegateAuthenticationProvider(
		async (requestMessage) =>
		{
			//adds token to header
			requestMessage.Headers.Authorization = new System.Net.Http.Headers.AuthenticationHeaderValue("Bearer", result.AccessToken);
		}
		));


		//pulls all users who's account is enabled
		var users = await client.Users.Request().Filter("AccountEnabled eq true").GetAsync();

		return Json(users);

	}
	catch(Exception ex)
	{
		return BadRequest(ex.Message);
	}
}

Finally, our app is ready to call our endpoint, on our home page, we will use the Microsoft Teams SDK to call our start page, then we will take the results and call our secured endpoint using the token.


@{
    ViewData["Title"] = "Employee Directory";
}

//styling
    .card{
        width:400px;
        height:200px;
        border:1px solid black;
        margin-bottom: 20px;
        padding: 5px;
    }

Employee Directory

label id="jsonResponse" label //script //run our script when window loads window.addEventListener("load", function(){ //load the microsoft teams SDK microsoftTeams.initialize(); //params for our login method authenticateParams = { successCallback: function(result){ var token = result["idToken"]; var access_token = result["accessToken"]; GetEmployeeDirectory(token); }, failureCallback: function(reason){ alert("failed: " + reason); }, height: 200, width: 200, url: "@ViewBag.SignInUrl" } //start authentication process microsoftTeams.authentication.authenticate(authenticateParams); }); //success callback to our secure api function GetEmployeeDirectory(token){ fetch("/Home/GetDirectory", { method: "GET", headers: { "content-type": "application/json;odata=verbose", "Accept": "application/json; odata=verbose", "Authorization": "Bearer " + token } }) .then(response =>response.json()) .then(results =>{ // creates an html object to be rendered in our app for(var i = 0; i < results.length; i++){ let div = document.createElement("div") div.className = "card" div.append(results[i].displayName); div.append(document.createElement("br")) div.append( results[i].mail) div.append(document.createElement("br")) div.append(results[i].businessPhones.length > 0 ? results[i].businessPhones[0] : document.createElement("label")) document.getElementById("jsonResponse").append(div); } }); }

Testing our Tab in Microsoft Teams

If everything is setup correctly and you run the application you will not get the expected results. You will see the page pop up to login, close, and get an error stating "failed: CancelledByUser". This is because the application is not running in Microsoft Teams. In order to test our application we need to run it in Teams so we can pull the user context.


To test this in Teams, we need a public URL. We could publish our site to Azure, but that makes debugging difficult. So we will use a tool called NGROK, which can be found here, to create a tunnel to our local application. To get a public URL run the command below in the NGROK window.


ngrok http --host-header=rewrite 5000


With our public URL, we need to go back into Azure and update our application return URL. Remember casing counts here if it doesn't match what is in our application it will give an error. 


Next we need to update the application Return URL to match our new NGROK URL.


With our application ready, we can now open Teams and configure our app. Teams has an app called "App Studio" that allows us to create an XML config file for our app. 


Walking through the App config details page and fill in your information, it is straight forward. You can find mine in the code project. Next click the tab capabilities, we will add our URL's here. Click the new personal tab button and fill in the fields, for the Content URL use the NGROK URL. Everytime you make a change to the NGROK URL, you will need to update this manifest.


Now we can install the application, I am using the web client so I will install it using Publish. If you have the desktop client, you can side load applications. To do so, click Test and Distribute in app studio install or publish in your tenant.

You should now be able to use your app, click the ellipse below files to find your application. If it is not there, at the bottom of teams you will find Apps, search for the app there and install it.

That's It! We now have a secure Teams tab using Azure AD.


Clone the project


You can find the full project on my GitHub site here https://github.com/fiveminutecoder/blogs/tree/master/OfficeEmployeeDirectory

Microsoft, Teams, Microsoft Teams, C#,C Sharp, Authentication, JWT, id token, access token, token, Teams Authentication, Microsoft teams SDK, teams sdk, Teams App, Teams Tab, five minute coder, Microsoft Graph, Azure AD, Azure Active Directory, Azure App, application,

Tuesday, March 9, 2021

Create a FAQ Bot using Microsoft Bot Framework

What is the Microsoft Bot framework?

The Microsoft Bot Framework is a set of APIs that simplifies the process of creating a chat bot using C#. The bot framework us set up a web service or Azure function that allows for interacting with a user via chat. The bot framework has several features for integrating chat bots with Microsoft Teams, Skype, and other Microsoft products. While the framework is geared toward Microsoft integration with Teams, it can be used as a stand alone bot system that can control: user flow, group chats, etc. 

Bots use JSON to write back and forth to the web service, but interpreters like Teams will recognize certain JSON objects, such as cards, and display them in a unique way without any styling. The framework also has a feature that allows for conversation flow called dialogs. This will manage a user's conversation flow and allow for more complex interactions like booking a hotel room, or implementing a pizza ordering system. 


Create a Bot in 5 Minutes

This example is going to build off of a previous example where we developed a NLP faq application. If you have not read the NLP example, please do so before beginning since we will use a lot of the codebase from this example. The NLP example can be found here: https://fiveminutecoder.blogspot.com/2020/08/using-mlnet-to-create-natural-language.html.  Before creating our chatbot, we need to get the bot templates. There are several starting templates to choose from, for this example we will use the echo bot. This bot template just writes back to the chat what you type in which is perfect for our demo since we do not need any dialog flow. To install the template we just need to run the following commands.


dotnet new -i Microsoft.Bot.Framework.CSharp.EchoBot
dotnet new echobot -n BotFrameworkFAQBot


Once we have our framework setup, we need to install the Nuget package Microsoft.ML. This will allow us to use ML.NET to process our questions and post an answer.

From the NLP example we will want to bring over several items. The first being our trained machine learning model which we saved earlier called FAQModel.zip. We will also need our Prediction data model and our FAQ data model. 


using Microsoft.ML.Data;

namespace EchoBot.Bots
{
    public class FAQModel
    {
        [ColumnName("Question"), LoadColumn(0)]
        public string Question {get;set;}
        [ColumnName("Answer"), LoadColumn(1)]
        public string Answer {get;set;}
    }
}


using Microsoft.ML.Data;

namespace EchoBot.Bots
{
    public class PredictionModel
    {
        [ColumnName("PredictedAnswer")]
        public string PredictedAnswer {get;set;}
        [ColumnName("Score")]
        public float[] Score {get;set;}
    }
}

With our data moved from the previous project, we can go ahead and rename the EchoBot.cs to FAQBot.cs. This will break any dependency injection that is setup by our service, so we will need to go to the startup.cs and change the services.AddTransient<IBot, Bots.EchoBot>() to services.AddTransient<IBot, Bots.FAQBot>() 


// This method gets called by the runtime. Use this method to add services to the container.
public void ConfigureServices(IServiceCollection services)
{
	services.AddControllers().AddNewtonsoftJson();

	// Create the Bot Framework Adapter with error handling enabled.
	services.AddSingleton();

	// Create the bot as a transient. In this case the ASP Controller is expecting an IBot.
	services.AddTransient();
}


Our machine learning model is pretrained, so since this information is static we will create a singleton instance of our prediction engine . This way we do not have to read the file from filestream every time we want to predict an answer. 


//context or our machine learning model
static MLContext context;
//used to read and predict our questions
static PredictionEngine predictionEngine;

//creating a private staitc constructor
//Our model is not changing so it doesnt make sense to keep opening it and reading the zip for performance
static FAQBot()
{
	//structure of our data model
	DataViewSchema modelSchema;
	//the model loaded for prediction
	ITransformer trainedModel;
	context = new MLContext();

	//load our file
	using(Stream s = File.Open("FAQModel.zip", FileMode.Open))
	{
		trainedModel = context.Model.Load(s, out modelSchema);
	}

	//creates our prediction engine
	predictionEngine = context.Model.CreatePredictionEngine(trainedModel);

}

Now that our constructor on class are in place and loaded, all we need to do is call the predict function for our question and display the outputs. We want to ensure that we have some confidence in our predictions so we will check the score and only display the output if the prediction score over 60% confident. If not we will give the user a list of choices to choose from. 


protected override async Task OnMessageActivityAsync(ITurnContext turnContext, CancellationToken cancellationToken)
{
	//creates our FAQ model
	FAQModel question = new FAQModel()
	{
		Question = turnContext.Activity.Text,//gets text from bot
		Answer = ""
	};

	//uses our trained model to predict our answer
	PredictionModel prediction = FAQBot.predictionEngine.Predict(question);

	//accuracy of prediction
	float score = prediction.Score.Max() * 100;

	//gonna check if we were accurate,if below a threshold we will ask them to clarify
	if(score > 60)
	{
		//sends our answer back to the bot
		await turnContext.SendActivityAsync(MessageFactory.Text(prediction.PredictedAnswer), cancellationToken);
		await turnContext.SendActivityAsync(MessageFactory.Text($"We think our answer to your question is this accurate: {score}%"), cancellationToken);
	}
	else
	{
		//sends them suggestions that are clickable
		await turnContext.SendActivityAsync(MessageFactory.Text("Sorry, we didnt understand the question, please try selecting a question below"), cancellationToken);
		string[] actions = {"What are your hours?","How can I reach you?", "What payments do you accept?"};
		await turnContext.SendActivityAsync(MessageFactory.SuggestedActions(actions), cancellationToken);
	}
}

Our chatbot is now finished. SendActivityAsync allows us to send a message back to the user. this can be called at any time during the process and is helpful for long running processes. Microsoft also provides us a set of activities, found in the MessageFactory, for interacting with users. We can easily send images, cards, or attachments using the different types found in the factory.


Testing the Chatbot

With our bot endpoint setup, we now need to test it out. Microsoft provides a tool for emulating a bot system which you can find here: https://github.com/microsoft/BotFramework-Emulator/releases. The emulator will emulate a Teams chat so you can see how the responses will interact with Teams and other Microsoft products. Download the latest version, and run the application. Once the emulator is running, open your site by the URL http://localhost:{port}/api/messages. You should see a successful connection and the message "Hello and welcome!" This comes from our bot's "OnMemberAddesAsync" function found in the FAQBot.cs file. The final step is to ask the bot a question and test out the functionality.


Clone the project

You can find the complete project here: https://github.com/fiveminutecoder/blogs/tree/master/FAQBot
Microsoft, Bot, Chatbot, Bot Framework, Teams, Microsoft Teams, ML.NET, Machine Learning, AI, Artificial Intelligence, C#,C Sharp, NLP, Natural Language Programming, Robot
C#, C sharp, machine learning, ML.NET, dotnet core, dotnet, O365, Office 365, developer, development, Azure, Supervised Learning, Unsupervised Learning, NLP, Natural Language Programming, Microsoft, SharePoint, Teams, custom software development, sharepoint specialist, chat GPT,artificial intelligence, AI

Cookie Alert

This blog was created and hosted using Google's platform Blogspot (blogger.com). In accordance to privacy policy and GDPR please note the following: Third party vendors, including Google, use cookies to serve ads based on a user's prior visits to your website or other websites. Google's use of advertising cookies enables it and its partners to serve ads to your users based on their visit to your sites and/or other sites on the Internet. Users may opt out of personalized advertising by visiting Ads Settings. (Alternatively, you can opt out of a third-party vendor's use of cookies for personalized advertising by visiting www.aboutads.info.) Google analytics is also used, for more details please refer to Google Analytics privacy policy here: Google Analytics Privacy Policy Any information collected or given during sign up or sign is through Google's blogger platform and is stored by Google. The only Information collected outside of Google's platform is consent that the site uses cookies.