Showing posts with label database design. Show all posts

Tuesday, July 27, 2021

Data Caching in 5 minutes using Redis in Azure

What is caching?

Before I get into how to use Redis to cache data, it is important to understand what is caching and why we need it. To describe caching simply it is a way to store data in a more accessible way to increase performance. Probably the most common example is how a browser caches a site's images, CSS, and JavaScript files. It does this by storing the data locally to speed up web pages by not having to go out to the server and download them on every call.

Storing large files like images makes sense, but how can that thought process be applied to our back end systems? As business logic gets more complex, systems are making more calls to databases and sub systems than ever before. These calls and data manipulations take time, and by caching the results the applications performance will dramatically increase as the application doesn't have to waste time fetching data and manipulating the results every time someone needs it.

When to use caching.

So when should I use caching? If the data is not live how can we trust it? Why not just call the database every time if SQL is fast? These are all good questions, and caching is not a one size fit all answer. Usually caching is done in memory since it is faster than disk i/o , but this means storage is limited and more expensive.  We need to ask ourselves if it makes sense to cache this item. Below are a few questions that we need to ask ourselves before adding the complexity of caching.

  1. Will caching speed up the call? Why add an extra fail point if we do not see any improvements.

  2. Does the data change often? If the data is constantly changing our cache will become outdated very quickly and that would remove the point of the cache.

  3. Is the data accessed often? Memory is expensive, why store something that no one sees.

  4. Do I have more than one server? This is more of a how do I cache my data question. Having more than 1 server adds complexity to the system and if you cache directly to the server it means caching of the data will be out of sync and could cause issues for users between calls.
If the above questions are a yes, then caching is a good choice to lessen the burden on our other systems. 

How do I cache my data?

It has been decided caching is necessary to increase performance, how should the data be cached? Below is a diagram of how a cache flow should work.


If a small service is needing to cache data, then using MemoryCache is an easy way to start. Memory Cache will not scale out with your system and it will become quickly unusable. Our in memory cache's will not be synced so things like session data will be lost when a user hits a different server.

Using a separate service for caching will allow us to scale our system outwards and continue to keep a stateless web site. What is a stateless website? This means our backend does not have knowledge of previous actions. So if we are trying to keep track of a user's session we would use a session Id  with all calls to track the user' session independent of each transaction. This becomes extremely useful when dealing with microservices. Each service is developed independently usually with it's own database, so by using a session id our service can call the session service to pull user's session information and validate the call.

This is where Redis comes into play. Redis is a caching database that can be deployed and scaled independently of  the application. It is important to remember caching should not replace your persistent database storage, it should be treated as a temporary repository. 

Creating a Redis Caching database in 5 minutes.

In this blog, we will be using an instance of Redis deployed to Azure. Setup is easy search for "Azure Cache for Redis" and select your instance size.

Azure Setup


Using Redis Cache in 5 minutes

For this example we have two use cases to use Redis Cache. One to track our session and one to optimize a "complex" database call and cache it in Redis to improve performance.


To start, a web application is needed for pulling information. For this example, I will be reusing the database and tables creating in my previous blog post for email tracking which can be found here:  https://www.fiveminutecoder.com/2021/05/create-email-tracking-campaign-using.html. Once the databases are setup, the next step is to create the web application.


dotnet new mvc --n "RedisCacheExample"


For the site I have two pages, the Home page and the page to view the summary of email campaigns. These pages are pretty basic, so for brevity of the blog they will be omitted. If you would like to see the code please visit the repository at the end of the blog. The home page has a pseudo login page to create our session. I am not authenticating to anything just collecting the session data before moving to the campaign screen. The campaign screen requires a valid session id otherwise it will redirect to the home page to create a session.


For the session, I am using Redis only. Sessions are temporary and once a user leaves a website or is inactive the session needs to expire.  I have it configured for 10 minutes. If there is 10 minutes of inactivity a new session is required to continue. For a more secure site, long polling JavaScript can auto sign out a user by checking session status every minute or so. Below you will find the postback that create our session data in Redis.


[HttpPost, ValidateAntiForgeryToken]
public async Task Index(SessionModel Model)
{
	//creates a unique session id
	Guid sessionId = Guid.NewGuid();

	//This is a 5 minute project so we are going to code in controller
	//Create connection to Redis
	using(ConnectionMultiplexer redis = ConnectionMultiplexer.Connect(""))
	{

		//Get database, this returns default database
		var db = redis.GetDatabase();

		//add session information to Redis with a 10 minute expiration time
		await db.StringSetAsync(sessionId.ToString(), JsonConvert.SerializeObject(Model),TimeSpan.FromMinutes(10));

	}

	//Session created, now go to campaigns
	return RedirectToAction("Index", "Campaigns", new { SessionId=sessionId.ToString()});
}


With our user information collected and our session created we will now move to the campaigns page. This is where I make my SQL call to pull in the campaigns. This example might not be the most performance hungry SQL call but it is complex enough that caching helps with performance.


async Task> GetCampaigns()
{
	//Replace with your sql connection string
	string cs = "";

	//List to hold our campaigns
	List types = new List();

	//connct to sql
	using(SqlConnection connection = new SqlConnection(cs))
	{
		//Open our SQL connection
		connection.Open();

		//complex SQL query worthy of being cached
		using(SqlCommand cmd = new SqlCommand(@"select Count(dbo.campaign_tracking.Campaign) EmailsOpened, dbo.campaigns.CampaignId, dbo.campaigns.Subject from dbo.campaign_tracking
												right join  dbo.campaigns on dbo.campaign_tracking.Campaign = dbo.campaigns.CampaignId
												Group By  dbo.campaign_tracking.Campaign, dbo.campaigns.CampaignId, dbo.campaigns.Subject", connection))
		{

			//execute query
			SqlDataReader reader = await cmd.ExecuteReaderAsync();
			while(await reader.ReadAsync())
			{
				//object for storing campaign information
				CampaignTypes type = new CampaignTypes()
				{
					CampaignId = reader["CampaignId"]!= null ? reader["CampaignId"].ToString() : "invalid id",
					Subject = reader["Subject"] != null ? reader["Subject"].ToString() : "Subject not found",
					EmailCount = reader["EmailsOpened"] != null ? Convert.ToInt32(reader["EmailsOpened"]) : 0
				};

				types.Add(type);
			}
		}

		//close connection
		connection.Close();
	}

	//return our list of campaigns
	return types;
}

In our Campaigns controller, I have setup a basic Cache-Aside pattern for pulling our data. What you see in our action is check if the data exists in our Redis Cache Database, if it doesn't get the data from SQL and update Redis. 


public async Task Index(string Sessionid)
{
	//Create a connection to Redis
	using(ConnectionMultiplexer redis = ConnectionMultiplexer.Connect(""))
	{
		//Get Redis Database
		var db = redis.GetDatabase();

		//set viewmodel so they it is not null for our view
		CampaignsModel campaigns = new CampaignsModel()
		{
		  CampaignTypes = new List(),
		  Session = new SessionModel()  
		};

		//Check is session id exists in redis
		if(await db.KeyExistsAsync(Sessionid))
		{                   
			//session id exists in Redis check for campaign cache in redis
			if(await db.KeyExistsAsync("CampaignTypes"))
			{
				//campaigns are cached, get data from redis
				var campaignCache  = await db.StringGetAsync("CampaignTypes");
				campaigns.CampaignTypes = JsonConvert.DeserializeObject>(campaignCache);
			}
			else
			{
				//campaigns are not cached, get campaigns from SQL
				campaigns.CampaignTypes = await GetCampaigns();

				//save campaigns to Redis for future use
				await db.StringSetAsync("CampaignTypes", JsonConvert.SerializeObject(campaigns.CampaignTypes), TimeSpan.FromMinutes(5));
			}


			//pull session information from Redis
			var session = await db.StringGetAsync(Sessionid);
			campaigns.Session = JsonConvert.DeserializeObject(session);
			campaigns.Session.Id = Sessionid;

			//A refresh of the page should extend our session open by 10 minutes
			await db.KeyExpireAsync(Sessionid, TimeSpan.FromMinutes(10));

			return View(campaigns);
		}
		else{
			//session expired
			return RedirectToAction("Index", "Home");
		}
	}
}

The result is a basic table that shows our list campaigns and the number of emails opened from the campaign.


Clone the project


You can find the full project on my GitHub site here https://github.com/fiveminutecoder/blogs/tree/master/RedisCacheExample


C#, dotnet, dotnet core, .NET, MVC, Razor, Redis, Cache, Caching, Cache Database, Microsoft, .Net Core, .Net 5, .Net Framework, SQL

Monday, May 17, 2021

Create an Email Tracking Campaign using Azure Functions

Email Campaigning

Have you ever received an email and opened it, only to receive another email that is tailored more toward what you viewed? This is email targeted campaigning, ands can be done in several ways. A campaign email system allows you to track several points of interaction with an email to gain the most insights from a users. The basics are, is the email sent, did the user open the email, and what links did the user click, along with how many times the email was opened or clicked by the user. Tracking who is sent an email can be easily handled with our code, if the email does not error out it was sent. Tracking a link click is easy too, each link inside the email can be formed to include a unique identifier and user information from the campaign system the interaction.. But what happens if you don't click a link how does the company know you were interested? There must be something in the email to do this? 

Simple, an image. These images are usually referred to as 0 pixel images which are image tags that reference a URL instead of an image. So when the email loads the image it is actually logging the interaction with the email.

In this post, we are going to create an email campaign system in 5 minutes.

Creating an Email Campaign in 5 Minutes

Setup SQL

The first thing we need to do to setup our email campaign is create a database to capture our campaign details. I will be using Azure SQL  to do this. This is pretty straight forward, choose your plan and follow the steps. Once done, make sure to add your IP to the firewall. You will need at least one SQL database to add our tables.


For this post, we will be setting up 3 simple tables, one for creating a campaign, one for tracking if an email is sent, and one for tracking if an email is opened. Thee commands can be run from SQL Server management studio or the Query Editor Preview (at the time of this writing) feature in the Azure SQL section .


CREATE TABLE Campaigns(CampaignId nchar(36) NOT NULL PRIMARY KEY, Subject nvarchar(255) NOT NULL)
CREATE TABLE sent_tracking(SentID nchar(36) NOT NULL PRIMARY KEY, Email nvarchar(255) NOT NULL, Sent bit NOT NULL, Campaign nchar(36) NOT NULL FOREIGN KEY REFERENCES Campaigns(CampaignId))
CREATE TABLE campaign_tracking(TrackingId nchar(36) NOT NULL PRIMARY KEY, Email nvarchar(255) NOT NULL, OpenDate datetime NOT NULL, Campaign nchar(36) NOT NULL FOREIGN KEY REFERENCES Campaigns(CampaignId))

Setup Azure Function

With our SQL database setup, we can now create an Azure function for tracking our emails that our opened. I will be using a VS code extension for creating the Azure Function this will allow me to create and deploy my function to Azure. This extension is aptly named "Azure Functions". 


With our add-in installed, we can create and setup our Azure Function. If prompted, sign in to your Azure account. once you see your Azure subscription, click the lightning bolt with a plus next to it to create the function.


You will be asked a series of questions, the first is the language to create the function, this post I will use C#.


Next, VS Code will ask what type of function I want. I want the function to execute every time it is called, so HTTPTrigger is the project type.


The function needs a name, for the purposes of this blog I will name it EmailTrackingFunction. A namespace will be required as well.


Finally, Azure wants to know how to secure the function, no credentials will be used so it will be anonymous for this example. 


Our Azure function will capture the user's email address and what time they opened the email. Every time the email image is loaded, our system will make an entry into our SQL database.


using System;
using System.Collections.Generic;
using System.Net;
using Microsoft.Azure.Functions.Worker;
using Microsoft.Azure.Functions.Worker.Http;
using Microsoft.Extensions.Logging;
using System.Data.SqlClient;
using Microsoft.Extensions.Configuration;

public static class EmailTrackingFunction
    {
        [Function("EmailTrackingFunction")]
        public static HttpResponseData Run([HttpTrigger(AuthorizationLevel.Anonymous, "get", "post")] HttpRequestData req,
            FunctionContext executionContext)
        {
            var logger = executionContext.GetLogger("EmailTrackingFunction");
            

            // create connection to local settings
            var config = new ConfigurationBuilder()
                        .AddJsonFile("local.settings.json", optional: true, reloadOnChange: true)
                        .AddEnvironmentVariables()
                        .Build();
            string cs = config.GetConnectionString("EmailTrackingDB");

            //connect to sql db
            using(SqlConnection connection = new SqlConnection(cs))
            {

                //insert our tracking data into our database
                var queryStrings = System.Web.HttpUtility.ParseQueryString(req.Url.Query);
                connection.Open();
                using(SqlCommand cmd = new SqlCommand("INSERT INTO campaign_tracking (TrackingId, Email, OpenDate, Campaign) Values(@TrackingId, @Email, @OpenDate, @Campaign)", connection))
                {
                    cmd.Parameters.AddWithValue("@TrackingId", Guid.NewGuid());
                    cmd.Parameters.AddWithValue("@Email", queryStrings.Get("Email").ToString());//email that opened link
                    cmd.Parameters.AddWithValue("@OpenDate",DateTime.Now); //time email was opened
                    cmd.Parameters.AddWithValue("@Campaign", queryStrings.Get("Campaign").ToString()); //ID linked to another table with campaign details

                    cmd.ExecuteNonQuery();

                    //log that email entry was made
                    logger.LogInformation("Logged {0}", queryStrings.Get("Email").ToString());
                }

                connection.Close();
            }

            
           //create a successful response to return in the function
            var response = req.CreateResponse(HttpStatusCode.OK);
           
            return response;
        }

In order to connect to the SQL database, we must reference our connection string. When running locally, we can setup our local.settings.json file to read the connection string. This file does not deploy to Azure, but will allow you to setup a config to mimic the configuration settings in Azure.


{
  "IsEncrypted": false,
  "Values": {
    "AzureWebJobsStorage": "",
    "FUNCTIONS_WORKER_RUNTIME": "dotnet-isolated"
  },
  "ConnectionStrings" : {
    "EmailTrackingDB": "{sql connection string}"
  }
}


With the function created, the final step is to deploy it to Azure. To do this, click the Up arrow in our add-in. If this is the first deployment, it will ask to create the Azure Function or select an existing one. 


Now when you log back into Azure, you should see your newly created function under app services. The final thing we must do is configure the connection string in Azure, since the local.settings.json file will not deploy to our function. Inside the configuration of our function, there is a section for connection strings. All that needs to be done is copying and pasting the connection string here and save the updated configuration.


Create Console App for sending emails


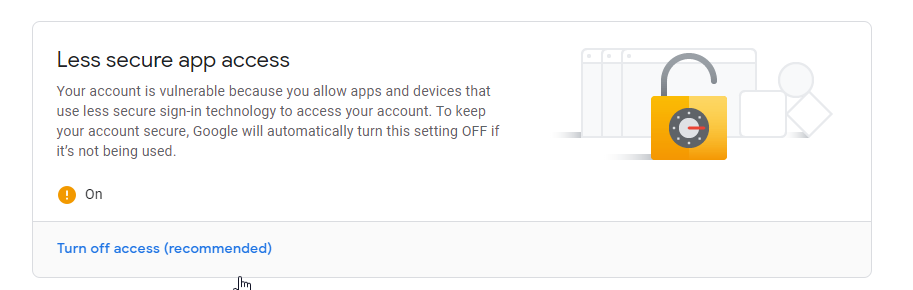
The email tracking function is now setup, but in order to test the function an email job must be created. To do this, I will just create a console application that sends emails through Gmail. Gmail allows us to create a SMTP connection and send out emails using that email address. The trick is to allow the app to send emails by allowing less secure connections.


With Gmail configured, we can create our app. I am using SMTP to send the email. Along with creating the entries for our campaign so that we can track how many people open the email.


For our example to work we need to create a campaign with a unique id and then send and email. We will just do a simple insert into SQL to create our campaign, then we will take our unique ID and append it to a URL for our image to call back to the Azure function.

Before creating the function, the project will need references to SQL Client and Mail Client


using System;
using System.Net.Mail;
using System.Data.SqlClient;

Once the reference  to the clients are added, a function for inserting data into the campaign will be needed.

static string CreateCampaign(string Subject)
{
	//Replace with your sql connection string
	string cs = "Server=tcp:sqlconnection,1433;Initial Catalog=trackingdata;Persist Security Info=False;User ID={sql user};Password={sql password};MultipleActiveResultSets=False;Encrypt=True;TrustServerCertificate=False;Connection Timeout=30;";
	string campaignId = Guid.NewGuid().ToString();
	using(SqlConnection connection = new SqlConnection(cs))
	{
		//insert our data into our campaing table to track what campaigns are sent.
		connection.Open();
		using(SqlCommand cmd = new SqlCommand("INSERT INTO Campaigns (CampaignId, Subject) Values(@CampaingId, @Subject)", connection))
		{
			cmd.Parameters.AddWithValue("@CampaingId", campaignId);
			cmd.Parameters.AddWithValue("@Subject", Subject);//email that opened link

			cmd.ExecuteNonQuery();
		}

		connection.Close();
	}

	//return our Unique campaign id
	return campaignId;
}


Inside the main function, I will call the SQL function that returns a unique id and append it to the URL. Then to test I will send the URL to 1 email address.


static void Main(string[] args)
{

	string subject = "Testing Pixel";
	string fromEmail = "{from email}"; //replace with who is sending email
	string toEmail = "{to email}"; //test, this would usually be a list of users
	string campaignId = CreateCampaign(subject); //creates the campaign and returns guid
	string baseUrl = "https://{azure function}/api/EmailTrackingFunction"; //our azure function url
	string imgUrl = $"{baseUrl}?Email={toEmail}&Campaign={campaignId}";// our url for our image

	//connect to gmail
	using(SmtpClient client = new SmtpClient("smtp.gmail.com"))
	{
		client.Credentials = new System.Net.NetworkCredential(fromEmail, "from email password");
		client.Port =587;
		client.EnableSsl = true;

		//create our email
		using(MailMessage msg = new MailMessage(fromEmail, toEmail))
		{
			msg.Subject = subject;
			msg.Body = $"Mass mailout";
			msg.IsBodyHtml = true;

			client.Send(msg);

	
			//would log time/date email was sent in a database here
		}
	}


That's it, we now have a successful email campaign system for sending and tracking mass mailouts. 

Clone the project


You can find the full project on my GitHub site here https://github.com/fiveminutecoder/blogs/tree/master/EmailTracker


Microsoft, C#,C Sharp, Authentication, Azure Functions, SMTP, GMail, Azure App, application, SQL, SQL Server, Azure SQL, Transact-SQL, dot net, dot net core CMS, Content Management System
C#, C sharp, machine learning, ML.NET, dotnet core, dotnet, O365, Office 365, developer, development, Azure, Supervised Learning, Unsupervised Learning, NLP, Natural Language Programming, Microsoft, SharePoint, Teams, custom software development, sharepoint specialist, chat GPT,artificial intelligence, AI

Cookie Alert

This blog was created and hosted using Google's platform Blogspot (blogger.com). In accordance to privacy policy and GDPR please note the following: Third party vendors, including Google, use cookies to serve ads based on a user's prior visits to your website or other websites. Google's use of advertising cookies enables it and its partners to serve ads to your users based on their visit to your sites and/or other sites on the Internet. Users may opt out of personalized advertising by visiting Ads Settings. (Alternatively, you can opt out of a third-party vendor's use of cookies for personalized advertising by visiting www.aboutads.info.) Google analytics is also used, for more details please refer to Google Analytics privacy policy here: Google Analytics Privacy Policy Any information collected or given during sign up or sign is through Google's blogger platform and is stored by Google. The only Information collected outside of Google's platform is consent that the site uses cookies.